How to Use
How to Access
Access to our cluster can be done through Open OnDemand or via the JupyterLab (K8S) Terminal. In both options, it is essential to have a valid account in LIneA's computational environment. If you don't have an account, contact the Service Desk by email (helpdesk@linea.org.br) for more information.
Attention
Even with an active LIneA account, access to the HPC processing environment is not automatic. For more information contact the Service Desk at helpdesk@linea.org.br.
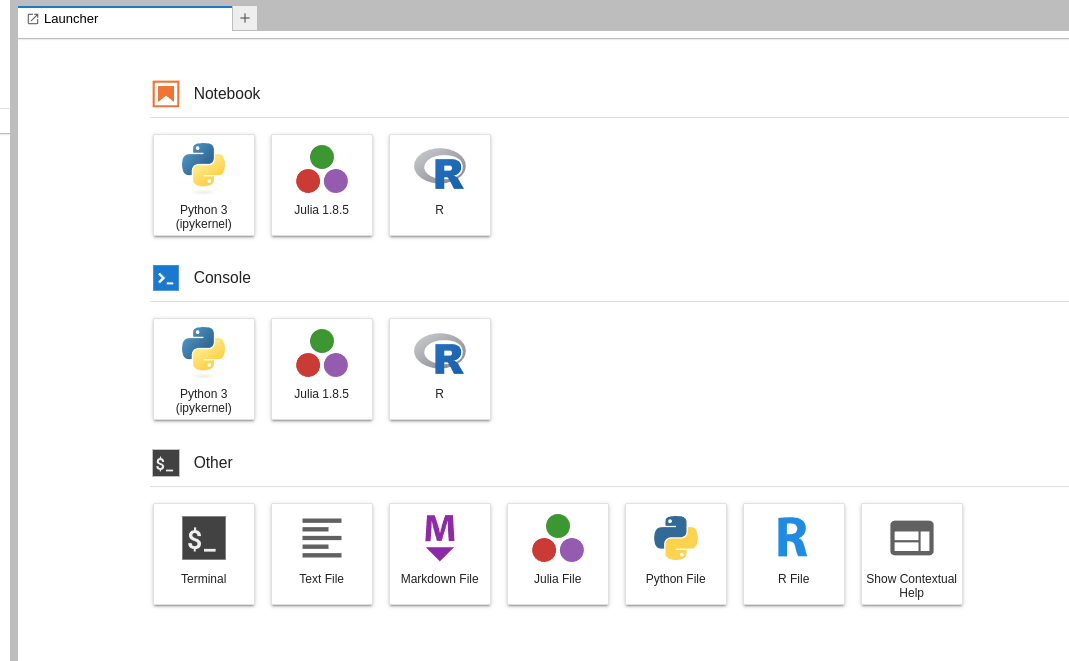
Accessing via JupyterLab terminal
In the home screen of your Jupyter Notebook, in the "Other" section, you will find the terminal button. When clicking it, you will be redirected to a Linux terminal, initially located in your home directory. To access the Apollo Cluster, simply execute the following command:
ssh loginapl01
$HOME and $SCRATCH
Compute nodes don't have access to your user home directory. Move or copy all files needed for job submission to your SCRATCH directory.
How to use the Scratch area
Your SCRATCH directory is the place where you can direct your job results files, as well as temporarily store data that is used by the code at the time of processing.
- To access your SCRATCH directory:
cd $SCRATCH
- To send files to your SCRATCH directory:
cp <FILE> $SCRATCH
Automatic Scratch cleaning
The scratch is a temporary storage area for the output and processing files of the cluster. To maintain the environment organized and ensure space available for all, an automatic cleaning script is in effect, which runs once a week. This process removes files that have not been accessed within the defined retention period - Currently, 45 days.
Essential configuration files (eg: .Bashrc,.Bash_Profile, .ssh, etc.) are automatically preserved and do not enter the exclusion process.
ATTENTION
Scratch should not be used for permanent storage. We recommend moving important data for your home directory.
How to use the Scripts area
Your SCRIPTS directory is where you can store scripts and codes to run in the cluster. It is also recommended to use this area to create environments Conda.
- To access your SCRIPTS Directory:
cd $SCRIPTS
Stay attentive
The script area is not included in the backup routine. Therefore, it should not be used as permanent data storage.
How to Submit a Job
A Job requests computing resources and specifies applications to be launched on those resources, along with any input data/options and output directives. Cluster task and resource management is done through Slurm. Therefore, to submit a Job you need to use a script like below:
  #!/bin/bash
  #SBATCH -p PARTITION                       #Name of the Partition to use
  #SBATCH --nodelist=NODE                    #Name of the Node to be allocated
  #SBATCH -J simple-job                      #Job name
  #----------------------------------------------------------------------------#

  ##path to executable code
  EXEC=/scripts/YOUR.USER/EXECUTABLE.CODE

  srun $EXEC
In this script you need to specify: the queue name (Partition) to be used; the node name to be allocated for Job execution; and the path to the code/program to be executed.
WARNING
It is strictly prohibited to submit jobs directly to the loginapl01 machine. Any code running on this machine will be immediately interrupted without prior notice.
- To submit the Job:
  cd $SCRATCH
  sbatch $SCRIPTS/PATH/TO/script-submit-job.sh
If the script is correct there will be an output indicating the job ID.
- To check job progress and information:
scontrol show job <ID>
- To cancel the Job:
scancel <ID>
Internet access
Compute nodes do not have internet access. Packages and libraries must be installed from loginapl01 in your scripts area.
EUPS (package manager)
EUPS is an alternative package manager (and official LSST one) that allows loading environment variables and including paths to programs and libraries in a modular way.
- To load EUPS:
Info
Currently, EUPS is automatically loaded after the user logs into any machine in the Apollo cluster.
- To list all available packages:
eups list
- To list a specific package:
eups list <PACKAGE>
- To load a package in current session:
setup <PACKAGE NAME> <PACKAGE VERSION>
- To remove loaded package:
unsetup <PACKAGE NAME> <PACKAGE VERSION>
Conda in the HPC Environment
Overview
Conda is centrally available on all cluster nodes at /opt/conda.
System conda environments are maintained by the operations team and are read-only.
(from here on, we refer to them as env or envs)
Each user can create and manage their own personal envs.
Checking Conda
Conda is already available as soon as you log in. To verify:
conda --version
Available Envs
To list all available envs, both system and personal:
conda env list
Example output:
# conda environments:
base                     /opt/conda
base-science             /opt/conda/envs/base-science

my-env                   /home/user/.conda/envs/my-env
analysis-xray            /scripts/user/.conda/envs/analysis-xray
survey-project           /scripts/cl/prj/survey-project
envs under /opt/conda/envs/ are maintained by support and cannot be modified.
Activating an env
conda activate base-science
To return to the base env:
conda deactivate
Creating Personal envs
In home (recommended for Jupyter and development)
conda create -n my-env python=3.11
The env will be created in ~/.conda/envs/my-env, accessible from both cluster and Jupyter.
In /scripts (recommended for cluster jobs)
conda create -p /scripts/$USER/.conda/envs/my-env python=3.11
For a shared project
If it does not exist yet, request project directory creation in /scripts/cl/prj/<project> via helpdesk@linea.org.br.
After creation:
conda create -p /scripts/cl/prj/<project> python=3.11
ATTENTION
/scripts has no backup guarantee. Keep your env definition files (environment.yml) versioned in git.
Removing an env
conda env remove -n my-env
Or by full path:
conda env remove -p /scripts/$USER/.conda/envs/my-env
Installing Packages
Always activate the env before installing:
conda activate my-env
conda install numpy scipy matplotlib
To install from a specific channel:
conda install -c conda-forge astropy
To install with pip inside the env:
pip install my-package
ATTENTION
Prefer conda install before using pip to avoid dependency conflicts.
Removing Packages
conda activate my-env
conda remove numpy
Exporting and Reproducing envs
To export the env definition:
conda activate my-env
conda env export > environment.yml
To recreate the env from the file:
conda env create -f environment.yml
Info
We recommend versioning environment.yml in git to ensure reproducibility of your experiments.
Using an env in Jobs
In scheduler-submitted jobs, activate conda explicitly in the script:
#!/bin/bash
#SBATCH --job-name=my-job
#SBATCH --ntasks=1

source /opt/conda/etc/profile.d/conda.sh
conda activate my-env

python my_script.py
Info
The env active in your shell is not inherited automatically by the job. source and conda activate are required in the script.
Best Practices
- Do not install conda in
/scratch- scratch is for temporary I/O data, not environments. Environments there will be lost. - Do not install conda directly in
/scripts/<username>- always use the.conda/envssubdirectory under your/scriptsdirectory. - Keep
environment.ymlin git - this is the only guarantee of reproducibility for yourenv. - Use
mambainstead ofcondato install packages - dependency solving is faster:mamba install numpy scipy - Large environments can affect filesystem performance. If your job heavily uses many packages, consider discussing
conda-packusage with helpdesk.
Where envs are created
| Context | Default path | Persistent |
|---|---|---|
conda create -n name |
~/.conda/envs/ |
✅ yes |
| Jupyter (k8s) | ~/.conda/envs/ |
✅ yes |
| Cluster job | /scripts/$USER/.conda/envs/ |
⚠️ no backup |
| Shared project | /scripts/cl/prj/<project> |
⚠️ no backup |
Using conda-pack for Large-Scale Jobs
conda-pack packages a full conda env into a .tar.gz file that can be unpacked and used directly on the compute node, without NFS access during execution.
This is recommended for jobs that run on many nodes simultaneously, avoiding a burst of NFS access to /opt/conda at activation time.
System envs are already available as packaged archives in /opt/conda/packed/:
/opt/conda/packed/
└── base-science.tar.gz
Using it in a job script
#!/bin/bash
#SBATCH --job-name=my-job

# Unpack env in node-local scratch
mkdir -p /scratch/$USER/envs/base-science
tar -xzf /opt/conda/packed/base-science.tar.gz -C /scratch/$USER/envs/base-science

# Activate locally, without relying on NFS
source /scratch/$USER/envs/base-science/bin/activate

# Run as usual
python my_script.py

# Clean up env at the end of the job
rm -rf /scratch/$USER/envs/base-science
Packing a personal env
If you want to use conda-pack with a personal env:
conda activate my-env
conda pack -o /scratch/$USER/my-env.tar.gz
Info
The .tar.gz file can be large depending on the environment.
When to use
| Scenario | Recommended |
|---|---|
| Interactive development on login | ❌ |
| Jupyter (k8s) | ❌ |
| Short jobs on few nodes | ⚠️ optional |
| Long jobs or many simultaneous nodes | ✅ |
| Environments with many packages | ✅ |
Support
For questions or to request creation of system envs, open a ticket with helpdesk.
Useful Slurm Commands
To learn about all available options for each command, enter man <command> while connected to the Cluster environment.
| Command | Definition |
|---|---|
| sbatch | Submits job scripts to execution queue |
| squeue | Displays job status |
| scontrol | Used to display Slurm state (various options available only to root) |
| sinfo | Displays partition and node status |
| salloc | Submits a job for execution or starts a real-time job |